Dear reader: This article contains links to products and services that I may be compensated for, at no extra cost to you.
Nobody would disagree that a camera is an absolutely essential travel item (here are my 15 must-have travel items!) Mirrorless cameras are a godsend to travelers. They are smaller, cheaper, and lighter than DSLRs, but have exceptional image quality. However, choosing the best mirrorless camera for traveling is no easy task.
If you’ve spent any amount of time on this travel website, you may have noticed that I sometimes take some pretty OK photos. I don’t consider myself a professional photographer, but I have sold some photos over the years to travel magazines, news websites, and even a couple books. So I guess that means something, right?
For people who aren’t familiar with photography, the first question they often ask when they see a stunning travel photo is, “Wow, what kind of camera do you use?”
In my opinion, the camera and lenses don’t matter as much as other factors. Most cameras nowadays can take pretty amazing photos. The camera is a tool, but what matters more is the photographer’s skills, knowledge of the equipment he or she has, and post-processing of the images.
Having said that, I do really love the camera, the lenses I use with it, and other travel gear that I have carefully selected after doing tons of research.
In this post, I’m going to introduce the camera I use for all my travels, and why I like it so much. This camera has been on the road to dozens of countries with me. To be fair, I’ll also cover some cons and challenges to using this camera.
Overall, I think this is an excellent mirrorless camera for traveling, whether you want to upgrade from a smartphone without going too big, or downgrade from a DSLR because it is too big.
Table of Contents
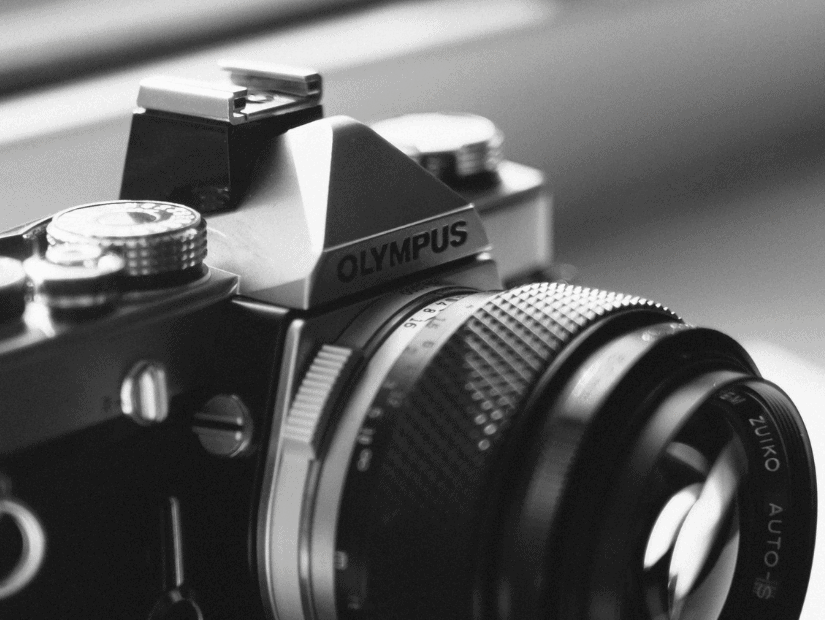
My Mirrorless Camera: Olympus OM-D E-M5 II

(Click the image or here to see price on Amazon)
About four years ago, I made the switch from my enormous DSLR camera to a mirrorless one. I’ve never looked back.
If you don’t know what a mirrorless camera is, these are significantly smaller and lighter than DSLRs, and in my opinion, the photo quality is just as good. They lack a reflex mirror, and sometimes some other features (for example, mine doesn’t have a built-in flash), but for the average photographer, and even many professional photographers nowadays, they are more than good enough. On that note, if you’re interested more generally in the history of cameras, here are some interesting facts and stats about the history of photography.
Anyway, once I decided to make the switch, I spent countless hours researching which mirrorless camera to get. There are so many specs to get bogged down with, but in the end my quest led me to the Olympus OM-D E-M5 II.
Important Update – There is now a newer model, the Olympus OM-D E-M5 Mark III! At the end of the article, I’ll cover what’s new in this model.
Features of the Olympus
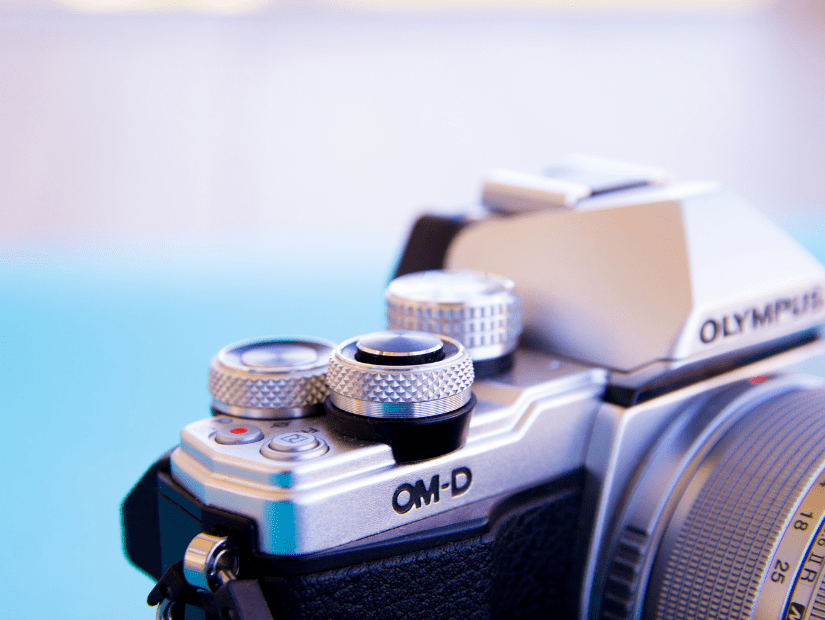
The Olympus OMD EM5 Mark ii essentially ticked all the boxes for what I wanted in my new camera. While I really don’t want to get too detailed with the specifications (you can find all of those here), these are some of the features that first attracted me to this camera:
- Small size and light weight (like all mirrorless cameras)
- Weatherproof: Can handle some light rain, snow, etc.
- Touchscreen that can flip around for selfie shots or taking photos at difficult angles.
- WiFi for transferring pictures to other devices while traveling.
- Vintage camera look (I went for the silver body)
- Excellent range of lenses to choose from
What I love about the Olympus
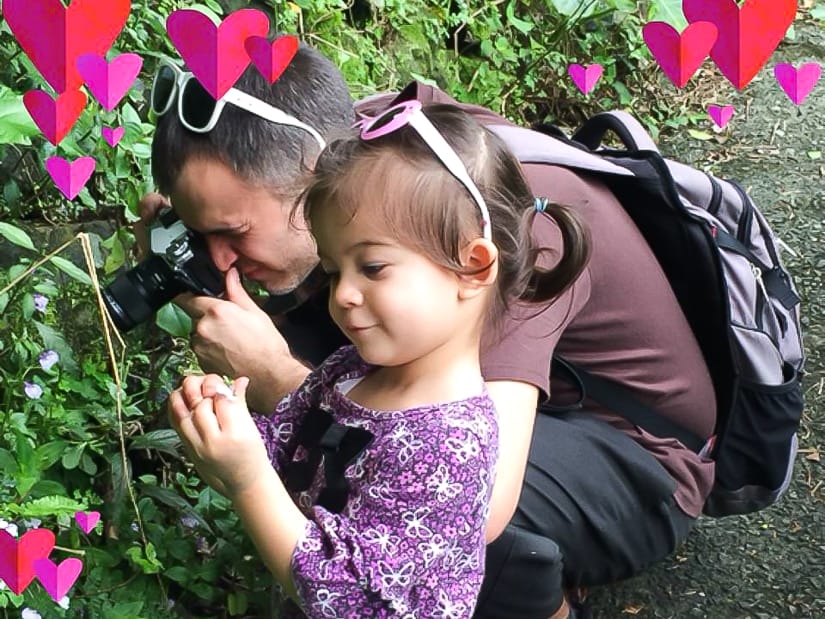
When I first switched from my huge DSLR to the Olympus omd em5 mark 2, I fell in love with photography all over again. Suddenly my camera gear was less than half the size and weight. As a result, I ended up taking my camera out way more often and shooting more pictures.
Around the same time, I spent some time learning how to use Lightroom better, and the quality of my pictures just skyrocketed in no time.
Because this camera is so much smaller, it’s easier to handle. Thanks to its impressive image stabilization, I’m often able to get great shots while holding it with just one hand, and it doesn’t give me a sore back from carrying it around my neck all day like the DSLR did. When traveling with young kids, this makes a world of difference.
Regarding the Olympus specifically, I find the camera has amazing image quality. I’m blown away by the pictures I’m able to get with it, especially once I adjust the shadows & highlights to really bring out all the detail.
I love that all of the buttons on the camera are totally customizable. After I got those configured the way I wanted, I almost never change them.
Because the camera is so small, it fits well on my little Gorilla Pod tripod. However, serious landscape photographers will want to get a better tripod for landscape photography.
Last, this camera and its lenses are quite a bit cheaper than comparable ones on a DSLR. Combined with the fact that the lenses are so much smaller and lighter, it’s easier and cheaper to get more of them. The money I made selling my used DSLR and lenses was almost enough cover my brand new Olympus and lenses.
Cons of the Olympus
While I really love the Olympus OMD EM5 Mark II for traveling, it’s not perfect. Here are a few downsides I’ve found over the last four or so years of using this camera.
Compared to DSLRs, the batteries of mirrorless cameras run out way faster. I carry four around at all times, and for longer trips where I don’t have access to power (for example multi-day hikes), that is barely enough.
The Olympus almost has TOO many features. This was a little overwhelming at first, but once I studied the instruction manual thoroughly, coupled with lots of online research, it all started to make sense. There are many features that I just never use.
While it’s nice to be able to customize all the buttons, the options are so extensive that it takes a while to get used to. In other words, it would be tough to buy this camera and start using it right away without doing a fair bit of research first, especially if you aren’t used to the Olympus interface.
Also, because there are so many little buttons in different places on this camera, I sometimes accidentally push one without realizing it. For example, I sometimes accidentally click my camera to manual focus without realizing it, then wonder why my camera won’t autofocus when I’m trying to get a shot. I supposed I could just deactivate that button, but it is convenient when I do need it.
Finally, if shooting in RAW, this camera’s “ORF” files have to be imported using Olympus software. You can’t import them directly with Lightroom. I find the Olympus software too slow to work with on my laptop, so I have export TIF files (which are huge) which I can then import and work with in Lightroom. I’m now totally used to this workflow, but it took some adjustment to get used to at first.
Which Lenses I Use on My Olympus

For a deeper analysis than what I will provide here, see my article covering my favorite Olympus lenses for traveling, including examples of photos I’ve shot with each one.
When buying this camera, you’ll have to make a very important choice. You can either get the standard Olympus Mark III kit, which comes with a 14-150mm lens, or you can buy the camera body only, then pick and choose your own lens or lenses (likely to be plural).
The 14-150mm lens is a decent all-in-one solution. For the average travel photographer, you could walk around with this lens all the time and never have to change it.
However, more serious photographers will want to opt for better lenses. Lenses with such a wide focal range like 14-150mm usually make quality sacrifices on either end. What’s more, this lens only opens up to a max aperture of f4.0, which for professionals just won’t cut it. Lastly, 14mm just isn’t wide enough for me; the difference between 12 and 14mm for shots of landscape, architecture, and so on is huge.
That’s why I personally bought the body only, then got the Olympus 12-40mm f2.8 Pro as my main walk-around lens. This lens produces AMAZING results, and I shoot most of my travel photos with it.
After that, I also picked up an Olympus 40-150mm for my zoom needs. For this one, I went with the basic model, as the pro version of the zoom lens is significantly pricier, larger, and I don’t use it nearly as much. If you’re into wildlife/bird photography, though, the pro one would be for you.
Finally, I picked up a super tiny, cute, and cheap Olympus 45mm f1.8 for portraits and low-light situations, and a totally unnecessary (but fun to play with) Olympus macro lens for taking cool, extreme close-up shots of bugs and flowers. But heads up that the last one is really hard to use and requires some extra equipment.
If you’re willing to get the older Mark II instead of the newer Mark III this better kit includes my favorite lens, the Olympus 12-40mm pro lens.
The New Olympus Mark III

(Click on image or here to see on Amazon)
I haven’t upgraded yet because I’m still totally happy with my Olympus OMD EM5 Mark II, but the Mark III version was released in late 2019. You can still buy the Mark II, but the Mark III is only a few hundred dollars more, so I would recommend going for the new one.
Here are some of the improved features on the Mark III:
- Higher resolution (20MB vs 16MB)
- More auto focus points (121 vs 81)
- Better high res mode (50MP vs 40MP, for taking some crazy hi-res shots)
- Improved video
Here is a more detailed comparison of the differences between the Olympus OM-D EM-5 Mark 2 and Mark 3.
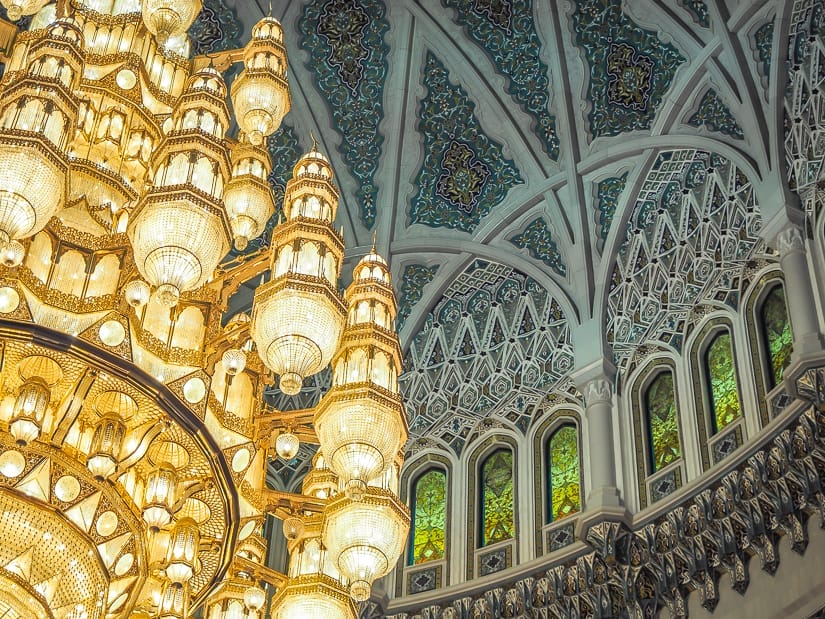
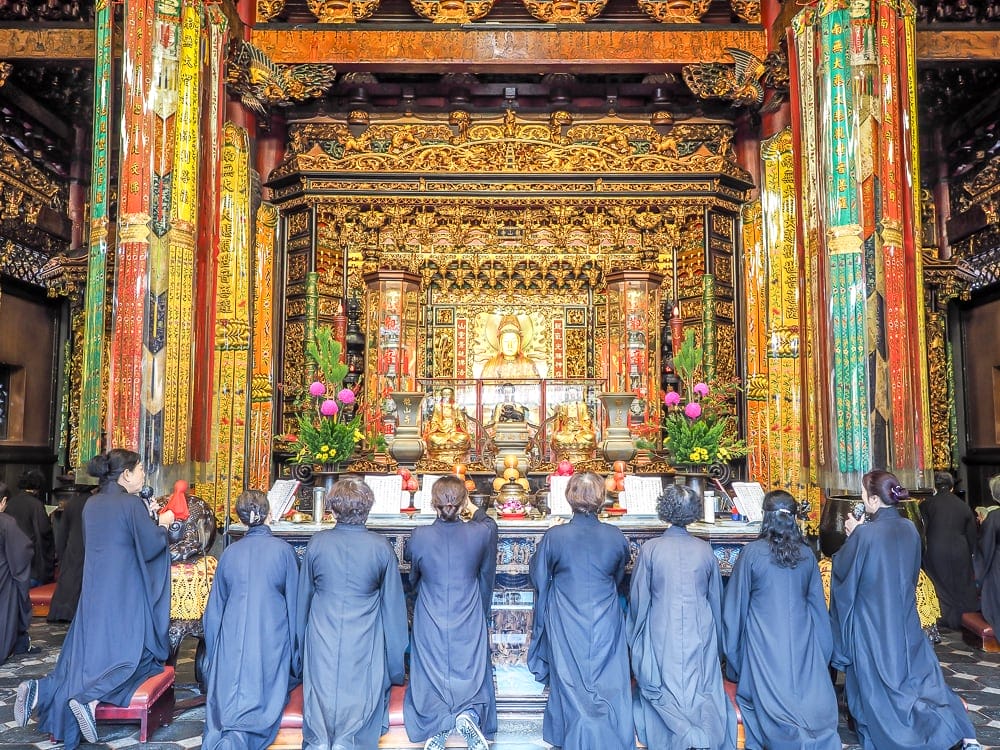
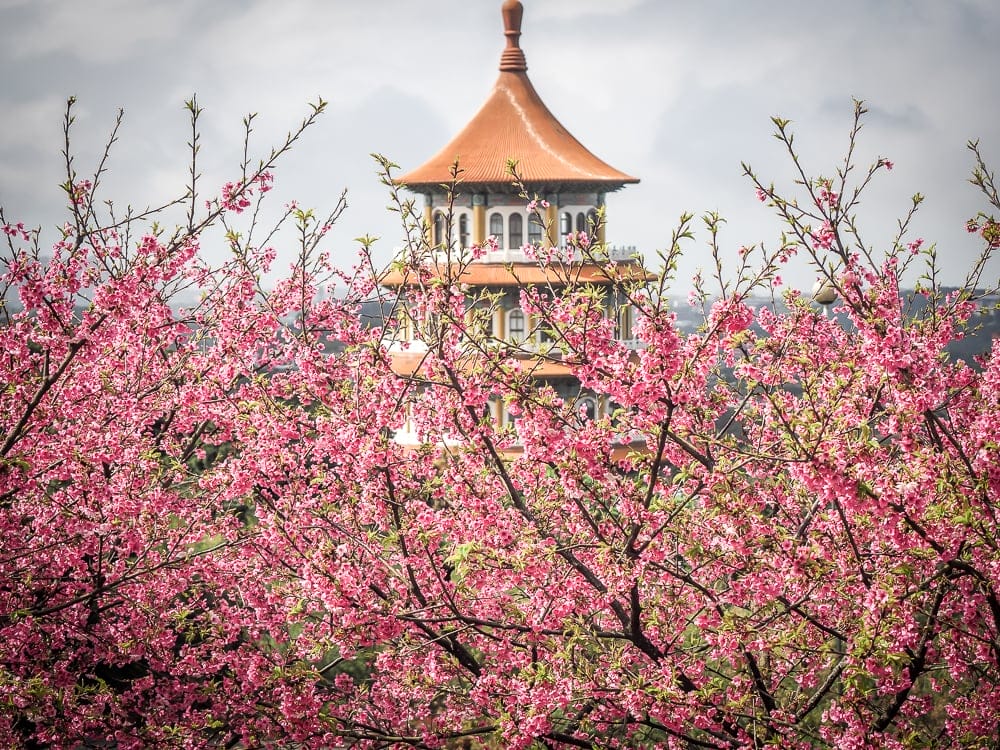
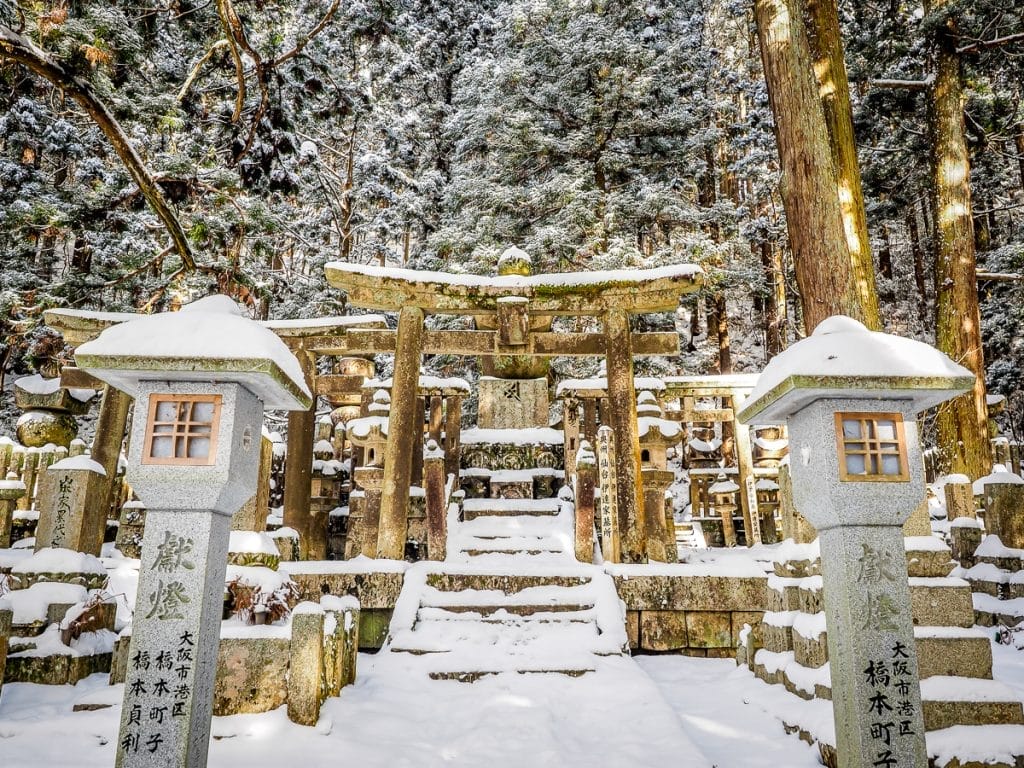
Photos Shot with My Olympus OM-D EM5 Mark II
Here are some random shots that I’ve taken with my Olympus OMD EM5 Mark ii. All of them were shot in RAW, imported with Olympus Viewer 3, and edited in Lightroom.


Final Thoughts on the Olympus Mirrorless Camera for Traveling
There are a lot of great cameras out there today. No matter which one you decide to get for traveling, take the time to understand its features, practice a lot, and you will surely be able to capture some amazing shots.
For me, the Olympus OMD EM5 Mark II has proven to be an excellent camera for travel. I’m always happy with the photos I manage to get for use on this website. There are even more features than I’ll ever need, and more than anything, I just love the small size, which allows me to pretty much wear the camera whenever I’m traveling. That way, I never miss a great photo opportunity.
I hope you have found this Olympus OMD EM5 Mark II camera review helpful, and happy shooting!

Those are some amazing shots, the color is so vibrant! Your article also takes a lot of the confusion out of buying a camera for someone who wants to shoot on the road.
Thanks!
Glad to hear it helped, and thank you so much!
This camera shoots in 4:3, 3:2, 1:1 and 16:9 format.
Therefore if you believe you are missing shooting in 4:3 format you have not read your manual and this is not a downside of owning this camera model.
Thanks for letting me know! I did real the manual, all 177 pages of it LOL! But that was years ago, and I missed/forgot that. I’ll update the article!
Thanks for your recommendation Nick, I picked up the same model recently. Still trying to figure things out, but your pictures are an inspiration. Super clear and vibrant. Does the last picture on this have a filter? If so which one?
Hey, thanks for your comment! I always have a UV filter on my main lens. I don’t think it makes a huge difference in images, but it is a relatively cheap filter that mainly serves to protect the lens from scratches. I think the clarity and vibrance in my photos in this post especially comes from post editing in Lightroom. I usually sharpen to 70 and reduce noise to 40 (give or take), which I find is a good balance between sharpness and softness. Then I also set highlights to 0 and shadows to 100 (a trick to bring out all possible details), then increase the white balance until it looks good. Play with contrast and clarity (usually just a slight increase) for the final touch. Hope this helps!
Thanks, I’ll give that a try!
I use the mark iii with the 12-40mm pro lens as well and could not be happier.
What camera strap do you use?
Sorry about the slow reply! I ordered my camera strap online years ago when I lived in Taiwan, but sorry that I don’t remember where from!